Basic React Native Part 18 - React Native Alert
PadaPart 17 [/basic-react-native-part-17-react-native-activitiindicator/]kita telah belajar dan mengenal ActivitiIndicator jadi jika anda belum mengikuti tutorial Part 17 [/basic-react-native-part-17-react-native-activitiindicator/] diharap…

Daftar isi
Pada Part 17 kita telah belajar dan mengenal ActivitiIndicator jadi jika anda belum mengikuti tutorial Part 17 diharapkan anda mengikuti tutorial Part 17 terlebih dahulu. Pada Tutorial Part 18 ini kita mengenal terlebih dahulu Basic React Native Alert.
Alert untuk meluncurkan sebuah dialog peringatan dengan judul tertentu dan pesan. React Native memberi kita pra kotak dialog membangun peringatan untuk menampilkan pesan peringatan pada layar aplikasi tapi itu peringatan tua kuno dan dosis tidak datang dengan modifikasi seperti menambahkan gambar dan tata letak disesuaikan. kita dapat membuat kotak dialog peringatan kita sendiri menggunakan komponen modal.
Alert Dialog Box di ios android React Native dengan OK dan tombol Cancel . Alert Dialog Box adalah pandangan jendela kecil yang menunjukkan pada layar aplikasi pada tugas tertentu untuk pergi informasi tambahan lebih lanjut atau kebutuhan dari pengguna aplikasi.
Berikut adalah berbagai jenis alert di React Native:
- Simple Alert.
- Two Option Alert.
- Three Option.
Mengimplementasikan Pada Project React Native
Buat Project React Native
Pada Tutorial Part 2 kita telah menginstall react-native-cli kemudian kita telah belajar cara membuat project baru react native. Berikut perintah cara untuk membuat project baru react native.
react-native init namafolderprojectBuat Project Baru
Install Aplikasi Debug Ke Handphone Android
Pada Tutorial Part 4 kita telah belajar cara menginstall Aplikasi Debug ke Handphone Android, untuk tata cara yang lebih jelas bisa langsung pelajari lagi pada Tutorial Part 4 terlebih dahulu. Secara singkat perintahnya seperti berikut.
react-native run-androidInstall Aplikasi Debug Ke Handphone Android
Buka File App.js Dengan Visual Studio Code
Secara default pada file App.js memiliki code yang cukup dan menghasilkan tampilkan seperti berikut ini
import React from 'react';
import {
  SafeAreaView,
  StyleSheet,
  ScrollView,
  View,
  Text,
  StatusBar,
} from 'react-native';

import {
  Header,
  LearnMoreLinks,
  Colors,
  DebugInstructions,
  ReloadInstructions,
} from 'react-native/Libraries/NewAppScreen';

const App: () => React$Node = () => {
  return (
    <>
      <StatusBar barStyle="dark-content" />
      <SafeAreaView>
        <ScrollView
          contentInsetAdjustmentBehavior="automatic"
          style={styles.scrollView}>
          <Header />
          {global.HermesInternal == null ? null : (
            <View style={styles.engine}>
              <Text style={styles.footer}>Engine: Hermes</Text>
            </View>
          )}
          <View style={styles.body}>
            <View style={styles.sectionContainer}>
              <Text style={styles.sectionTitle}>Step One</Text>
              <Text style={styles.sectionDescription}>
                Edit <Text style={styles.highlight}>App.js</Text> to change this
                screen and then come back to see your edits.
              </Text>
            </View>
            <View style={styles.sectionContainer}>
              <Text style={styles.sectionTitle}>See Your Changes</Text>
              <Text style={styles.sectionDescription}>
                <ReloadInstructions />
              </Text>
            </View>
            <View style={styles.sectionContainer}>
              <Text style={styles.sectionTitle}>Debug</Text>
              <Text style={styles.sectionDescription}>
                <DebugInstructions />
              </Text>
            </View>
            <View style={styles.sectionContainer}>
              <Text style={styles.sectionTitle}>Learn More</Text>
              <Text style={styles.sectionDescription}>
                Read the docs to discover what to do next:
              </Text>
            </View>
            <LearnMoreLinks />
          </View>
        </ScrollView>
      </SafeAreaView>
    </>
  );
};

const styles = StyleSheet.create({
  scrollView: {
    backgroundColor: Colors.lighter,
  },
  engine: {
    position: 'absolute',
    right: 0,
  },
  body: {
    backgroundColor: Colors.white,
  },
  sectionContainer: {
    marginTop: 32,
    paddingHorizontal: 24,
  },
  sectionTitle: {
    fontSize: 24,
    fontWeight: '600',
    color: Colors.black,
  },
  sectionDescription: {
    marginTop: 8,
    fontSize: 18,
    fontWeight: '400',
    color: Colors.dark,
  },
  highlight: {
    fontWeight: '700',
  },
  footer: {
    color: Colors.dark,
    fontSize: 12,
    fontWeight: '600',
    padding: 4,
    paddingRight: 12,
    textAlign: 'right',
  },
});

export default App;
Code Default App.js
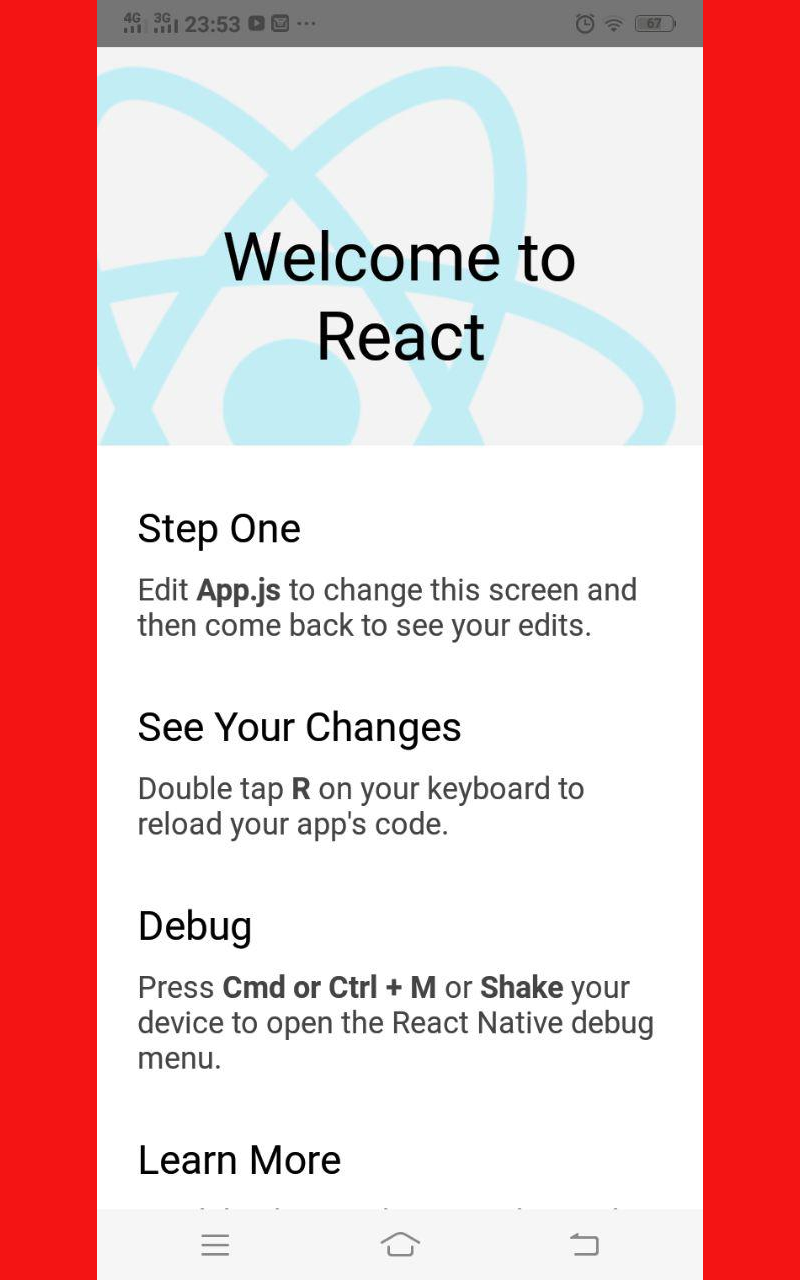
Tampilan Default File App.js
Menghapus Code Default App.js
Untuk memudahkan memahami component Alert kita hapus semua code dafault App.js. Setelah semua code default App.js dihapus maka ikuti langkah - langkah berikut ini.
- Import React
import React, { Component } from 'react'
import react
- Import Component Yang Dibutuhkan Untuk Project React Native
import {
    Alert,
    Button,
    View,
    StyleSheet
} from 'react-native';
Import Component
- Membuat Class Componet
class App extends Component {
  render() {
    return (  );
  }
}
Membuat Class
- Tambahkan ke 3 Function Berikut diatas
render
class App extends Component {

  // 1.Function Simple Alert
  simpleAlert=()=>{
    alert('Tutorial Buatan Wandi Pratama');
  }

  // 2.Function Two Option Alert
  twoOptionAlert=()=>{
    Alert.alert(
      'Hai...',
      'Apakah anda suka Artikel Ini?',
      [
        {text: 'Suka', onPress: () => console.log('Suka')},
        {text: 'Tidak Suka', onPress: () => console.log('Tidak Suka'), style: 'cancel'},
      ],
      { cancelable: false }
    );
  }

  // 3.Function Three Option Alert
  threeOptionAlert=()=>{
    Alert.alert(
      'Hai bro',
      'Apakah anda suka Artikel Ini?',
      [
        {text: 'Sangat Suka', onPress: () => console.log('Sangat Suka')},
        {text: 'Suka', onPress: () => console.log('Suka')},
        {text: 'Tidak Suka', onPress: () => console.log('Tidak Suka')},
      ],
      { cancelable: true }
    );
  }

  render() {
    return (  );
  }
}
Menambahkan Function
- Kemudian menambahkan component pada
returndi dalam class App
return (
 //4. Tambahkan code ini
      <View style={styles.container}>
        <Button title='Simple Alert' onPress={this.simpleAlert}/>
        <Button title='Alert with Two Options' onPress={this.twoOptionAlert}/>
        <Button title='Alert with Three Options' onPress={this.threeOptionAlert}/>
      </View>
    );
Code Return
- Dan tambahkan code
stylesebelumexport default
//5.Tambahkan code style
const styles = StyleSheet.create({
  container: {
    flex: 1,
    justifyContent: "space-between",
    backgroundColor: '#ecf0f1',
    margin: 20
  },
});
Code Style
- Export Class App
export default AppExport Class App
- Code Lengkap Alert
import React, { Component } from 'react';
import { Alert, Button, View, StyleSheet } from 'react-native';

class App extends Component {

  // 1.Function Simple Alert
  simpleAlert=()=>{
    alert('Tutorial Buatan Wandi Pratama');
  }

  // 2.Function Two Option Alert
  twoOptionAlert=()=>{
    Alert.alert(
      'Hai...',
      'Apakah anda suka Artikel Ini?',
      [
        {text: 'Suka', onPress: () => console.log('Suka')},
        {text: 'Tidak Suka', onPress: () => console.log('Tidak Suka'), style: 'cancel'},
      ],
      { cancelable: false }
    );
  }

  // 3.Function Three Option Alert
  threeOptionAlert=()=>{
    Alert.alert(
      'Hai bro',
      'Apakah anda suka Artikel Ini?',
      [
        {text: 'Sangat Suka', onPress: () => console.log('Sangat Suka')},
        {text: 'Suka', onPress: () => console.log('Suka')},
        {text: 'Tidak Suka', onPress: () => console.log('Tidak Suka')},
      ],
      { cancelable: true }
    );
  }

  render() {
    return (
       //4. Tambahkan code ini
      <View style={styles.container}>
        <Button title='Simple Alert' onPress={this.simpleAlert}/>
        <Button title='Alert with Two Options' onPress={this.twoOptionAlert}/>
        <Button title='Alert with Three Options' onPress={this.threeOptionAlert}/>
      </View>
    );
  }
}
//5.Tambahkan code style
const styles = StyleSheet.create({
  container: {
    flex: 1,
    justifyContent: "space-between",
    backgroundColor: '#ecf0f1',
    margin: 20
  },
});
export default  App
Code Lengkap
- Tampilan Alert
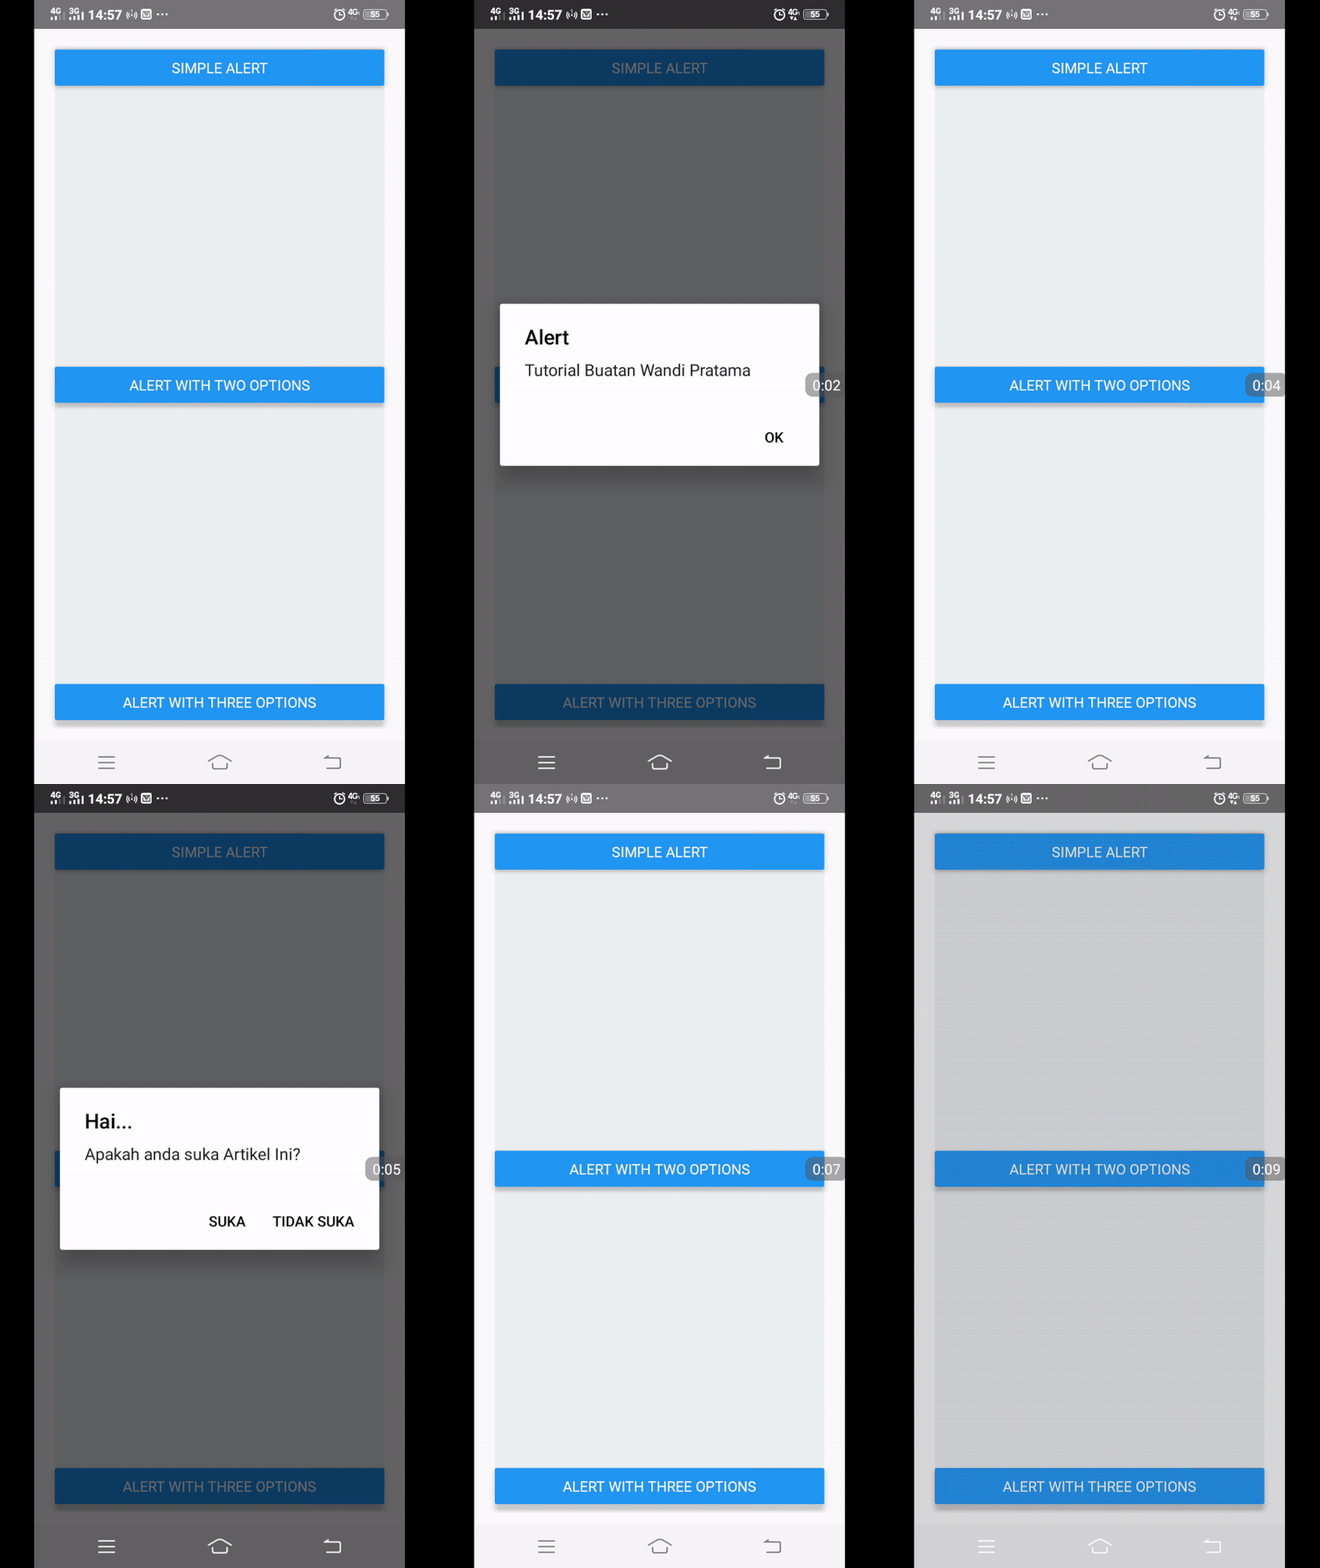
Tampilan Alert
Demikianlah pembahasan Tutorial Part 18 ini akan kita lanjutkan pada Tutorial Part 19
Catatan: tulisan ini dipindahkan dari cloudborneo.com, terbit pertama 3 Januari 2020.
Tentang penulis
Saya seorang Developer Mobile menggunakan Framework React Native dan saya juga memiliki pengalaman dibidang SYS Admin. Jasa menerima jasa pembuatan aplikasi dan website https://pindahdigital.com
Tulisan lainnya